Thinking, modeling, and computers
Thinking doesn’t just happen in our heads. When faced with a problem, we rarely sit perfectly still and just think. Instead, we interact with the world around us. We move around the room, talk to other people or to ourselves, write notes, draw diagrams, build prototypes, act out scenarios. We externalize the thinking process. Each externalized thought forms a model—a simplified representation that allows us to preserve, communicate, or reflect on the thought.
Computers have given us many new ways to work with our thoughts. Digital tools for professional drawing (
But the most versatile tool for externalizing our thoughts isn’t any piece of software—it is the pen & paper. Why is this? Can we design a new tool to help us think, with the simplicity and versatility of pen & paper, but also with the dynamism of software?
Thinking with models
When Watson and Crick discovered the structure of DNA they didn’t just conjure up a structure in their minds, and afterwards build a physical model to demonstrate it. They built a physical model to explore how the different parts of the DNA molecule could actually fit together, and only by doing so came to discover and understand the double-helical structure of DNA.
Models aren’t just the end result of the thinking process. Making models can be an integral part of the process of understanding. The act of externalizing, communicating, and reflecting through models changes and advances one’s inner thoughts, surfacing new realizations.

James Watson (left) and Francis Crick with their DNA model. (
Thoughts move quickly, so the tools we use to make our models must be fast to use and readily available.
- Songwriters often use a pocket voice recorder to capture fleeting melodies the moment they appear.
- Architects and designers use cheap, throwaway materials and rapid prototyping to physically explore permutations of their designs.
- Most universal of all, everyone in every field uses the pen & paper. They are ubiquitous, general, and easy beyond compare.
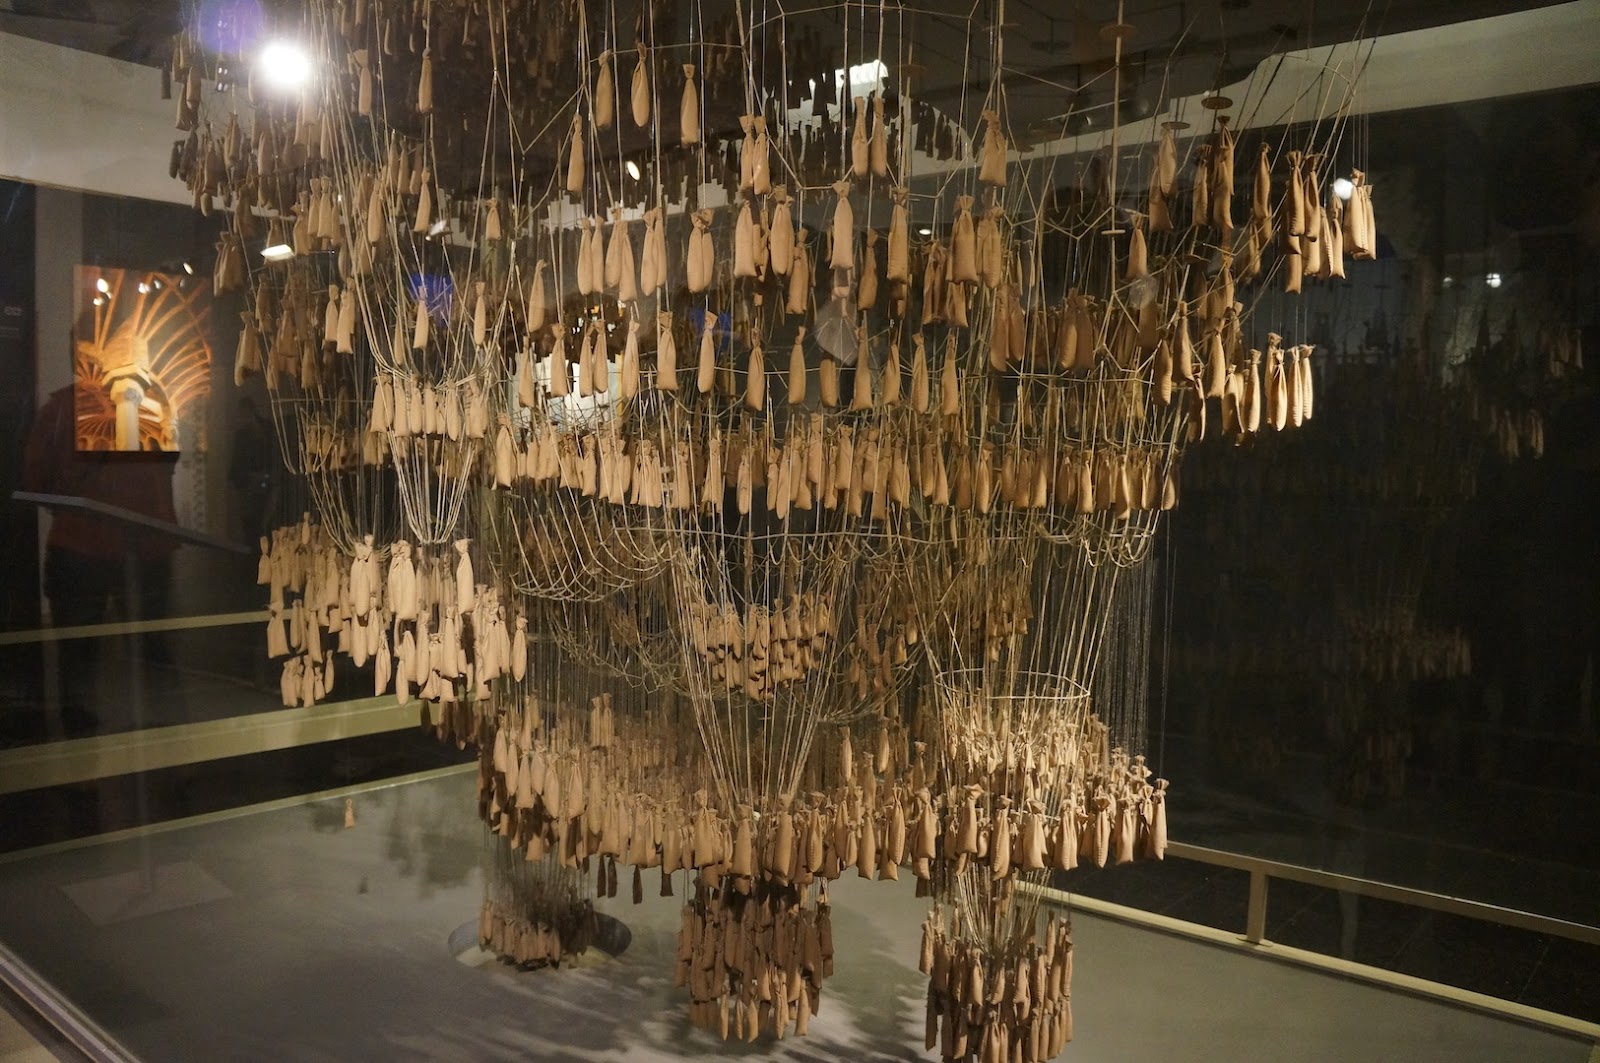
Model of Sagrada Famillia by Antoni Gaudí—modeling an optimal arch by following a hanging chain. (
When it’s frictionless to externalize your thoughts, you can create many small variations and reflect on the consequences of each change. Just as you might enter into a conversation with a friend to discuss an idea—to untangle its different aspects and consequences—so too, by externalizing your thoughts using a tool like pen & paper, you enter into a kind of conversation with the tool and the models you make with it.
By engaging in a conversation (with a person, a piece of paper, or a computer), thinking becomes a feedback loop. We don’t experience the world only by observing it. We poke and we prod at it. Thinking is a process of affecting and being affected; acting and understanding.
Modeling with computers
Computers offer clear advantages when it comes to working with external representations of our thinking:
- Embedded computation (offloading busywork). With pen & paper, we have to do calculations ourselves. Computers can do that for us, embedded within our models.
- Dynamism. We can simulate, move things around, see things from multiple perspectives, and filter information.
- Abstraction and reuse. We can make things and copy or reuse them without any additional cost.
We’ve seen a proliferation of software that leverages these capabilities—tools for word processing, 3d modeling, music production, and digital illustration, to name but a few. These software tools allow us to express the content of our thoughts, without having to necessarily understand how the computer actually does the things it does.
But note that these tools are focused on a specific, narrow range of media. They have interfaces and features catering to a preselected form of expression. They are molds that you may pour your thoughts into. They rarely allow you to create ad hoc models with unexpected structures—and they certainly don’t encourage it.
Moreover, these tools have a formal, businesslike focus on producing results. They are tools rich with features for polishing your work, preparing something that is ready to be shared, aligned with the technical and cultural expectations for how such a work ought to appear.
As creative people interested in externalizing all kinds of thought, we want tools for exploring the fringes of the possibility space, and for playing with a wide range of low-fidelity representations, not just tools for polished products in predetermined forms.
Of course, if it’s flexibility and creative freedom you want, you could always learn how to program and then write your own software. Programming languages allow you to create rich and dynamic models, or tools for working with models, in virtually any form you desire. But programming demands that you represent concepts as long swaths of abstract symbols in text files. You are no longer thinking in terms of the problem you’re trying to solve, or the thoughts you want to express and reflect on. Instead, you’re forced to think in terms of the computer—functions, and data. Imagine trying to discover the structure of the DNA molecule while at the same time worrying about control flow, syntax, and error handling. The concerns imposed by programming are incidental to the problem you’re trying to solve.
These are the current trade-offs. On the one hand, you have tools that allow you to work directly with the content of your thoughts. But those thoughts are constrained to preselected forms, and the tools have an unfortunate focus on producing polished results. On the other hand you have programming, giving you the freedom to use the full dynamic power of computation in any way you please. But this power comes at a great cost. You may no longer work directly with the content of your thoughts. Instead, you must work in terms of the computer.
Can we make different trade-offs? Can we unify the directness of pen & paper with the dynamism of software?
Design principles
The following set of principles guided our work from the outset.
How it should feel
We wanted something that doesn’t feel like programming.
- The simulation should happen inside the computer, not inside your head. When programming, much effort is spent figuring out what the program should do, by imagining in your mind how it will execute. We yearn for a world where this activity is better supported by the machine in front of you.
- You shouldn’t have to think about the technical details of the machine while working on the problem. When sketching with dynamic representations, the step of encoding the problem into computer code shouldn’t exist. You should be able to directly manipulate these dynamic representations without thinking about how they are evaluated by the underlying system.
- You shouldn’t have to name things just so you can refer back to them. The reliance on naming is an unnecessary formality imposed by the way that programming has been designed.
- There should be no errors, undefined values, or unknown parameters to fill in. You should never be locked out of your model because you mistyped something or made an erroneous connection. The model should remain alive and usable, even if it produces unanticipated output.
- You should see everything. This includes graphical representations of both data and behavior. You shouldn’t have to guess where dynamic behavior comes from. You shouldn’t have to blindly search through a set of text files or a list of objects to find the one responsible for the behavior on the screen.
- You should be able to inspect everything. You should be able to see how bigger parts are built from smaller parts, right down to the most fundamental atoms making up the tool. If there is any hidden state, there should be a way to reveal it and interact with it graphically.
In short, instead of molding your problem to the machine, the machine should be molded to fit your problem.
Importantly, while we didn’t want this to feel like programming, we did want to preserve the power of computation—interactivity, abstraction, encapsulation, iteration—and create an alternative, visual interface to it.
We wanted the building of models to resemble tinkering and bricolage. You should feel as if you’re thinking through the tool, and playfully exploring the problem space.
How it should function
Additionally, we followed a set of intuitions about the technical aspects of the project.
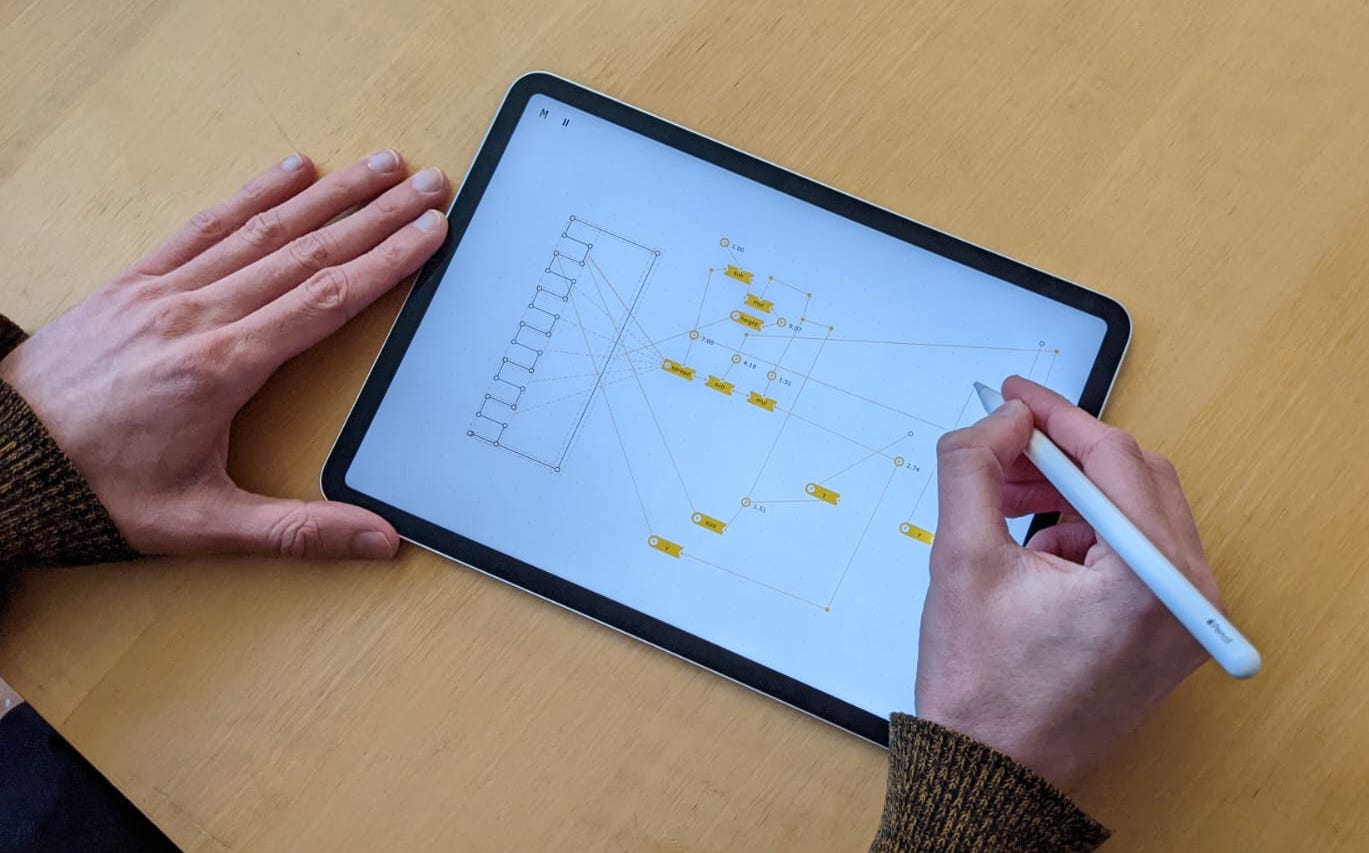
- Tablet & stylus can become the dynamic pen & paper. At Ink & Switch, we have been exploring tablet tools for power users with projects like Capstone, Muse and
Inkbase . We strongly believe that there’s something magical about pen & paper as a substrate to do your creative work, and that a tablet computer with a stylus could, with the right software, become a dynamic version of that substrate. - Vector graphics can be a great interface for thinking. We believe in visually solving problems. While hand-drawn paths have a sketchy feel to them—which is important for resisting the push to make polished products—vectors are much easier to work with and to turn into dynamic representations.
- The interface for drawing, and the interface for constructing dynamic behaviors, should be the same. You shouldn’t have to learn two separate modes of working.
- The content of what you’re working on is the most important thing. The chrome—on screen UI elements—should be kept to a minimum, shown only when contextually appropriate.
- You shouldn’t have to use an on-screen keyboard. The stylus and touchscreen are great input mechanisms for tablet devices. We strived to find a way to use them for programming. This implied finding ways to express computation other than typing sequences of symbols into a text buffer.
- This is a personal thinking space. We want an intimate notebook for exploring our own thoughts. Collaboration and sharing, while important, are out of scope for this project. Relatedly, turning models into apps or scalable systems is also out of scope, and goes against the spirit of sketchy, unpolished thinking.
Inspirations
Beyond the metaphysical yearnings and design goals explored above, our work builds on generations of existing research.
The overlap of drawing and computing
These projects offer ways to visually express computation—building dynamic models, data visualizations, and interactive diagrams by directly manipulating graphical representations. They show alternative interfaces to the very same set of computational ideas behind conventional text-based programming.
 Drawing Dynamic
 A bin of parts
These projects show how building software can be about recomposing visual elements. By carefully thinking about interfacing between components, the building of dynamic models (ThingLab) or situated software (Fabrik) is merely a matter of joining smaller parts into bigger wholes.

Programming as a medium for thinking
There’s a flavor of programming that’s about code as a thing to think through to solve problems at hand, instead of code being merely a means to make software that in turn fulfils some purpose.
While the aesthetics of these inspirations aren’t relevant to us, their different relationship between thinking and code is an important reference point.
Non-inspirations
Finally, it’s worth mentioning a few projects that seem relevant or similar to our work. These projects are interesting in their own right, but aren’t well aligned with one or more of our goals. Identifying them as non-inspirations early helped us hone and focus our work throughout the project.
First, most visual programming languages, which feature colorful blocks of code or nodes connected by wires—
Second, most live editor tools, which synchronize a textual code editor on one side with a visualization of the code’s output on the other—
In both of these types of tools, you’re still programming with code—manipulating abstract symbols, which indirectly produce some output that exists separately from the code. What we want are tools that let us work directly with a graphical representation of our problem of interest, not with some form of code necessary to express that problem to the machine.
Crosscut
We’re now ready to introduce Crosscut, a tool for drawing dynamic models.
To explore the basic concepts of the tool, we’ll build a Varignon

Concrete Ink
At the surface level, Crosscut is a very simple vector drawing application: you can draw only points and straight lines. Crosscut is meant to be a dynamic alternative to pen & paper, so we call these drawings ink.
There are two kinds of ink in Crosscut. The first is colored black, and we call it concrete ink. You’ll use these black points and lines to concretely draw representations of your thoughts.
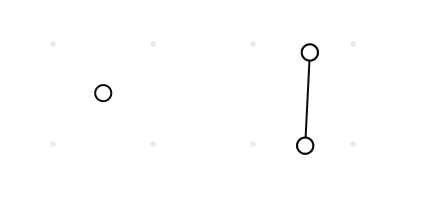
A concrete point on its own (left), and a concrete line connecting two concrete points.
One of the most basic interactions in Crosscut is snapping. Drag one point close to another and they’ll snap together. You can drag the point away to abort the snap, or lift the stylus (shown as a red dot in the video below) to create a connection. This is useful for drawing and for adding dynamic behavior, which we’ll explore next.
Meta ink
Imagine trying to make one of the concrete points move dynamically. The status quo approach would be to give it a symbolic name like point1, and then manipulate that symbol with code.
function update() {
  point1.x = Math.sin(Date.now());
  requestAnimationFrame(update);
}
update();
As we explained in earlier sections, this approach corrupts the types of thinking you can do while working with dynamic models. It forces you to work symbolically instead of visually, even though the model you’re making is in a visual medium. Worse, you need to express the dynamic behavior in terms of how the machine works, not in terms that are more relevant to the model or the behavior itself.
In contrast, we designed Crosscut to let you add dynamic behavior directly to your concrete representations. This is accomplished with a second type of ink, rendered in yellow, which we call meta ink. In addition to being something you can draw with, meta ink creates a dynamic relationship between the things it touches. We’ll explore this relationship in depth in the next section.
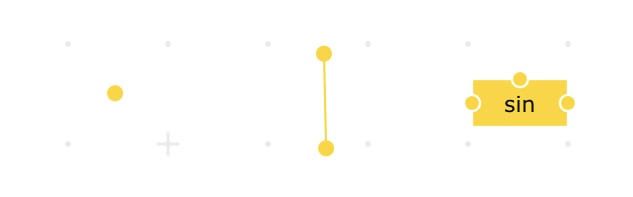
From left to right: a meta point, meta line, and sin meta node.
Crosscut comes with a selection of prebuilt meta nodes that can be connected via meta lines to manipulate the concrete ink things you draw. Meta nodes make up the low-level programming interface within Crosscut. They have a passing similarity to other node-and-wire programming tools, with some crucial differences we’ll explore shortly.
The first meta node we will examine is the property picker. This meta node has a rounded left side containing a snappable meta point, which should be connected to concrete points. On the right, the node has a flat side with another snappable point, which should be connected to other meta nodes (most of which also have flat sides, a design clue that they’re meant to be connected to one another).
In the example below, the property picker nodes are connected to value meta nodes, which simply display a numeric value.

Using property picker and value nodes to measure the x and y coordinates of a concrete point.
Using meta ink and a property picker meta node, you can extract information about concrete points by directly connecting to them. This might seem like a small detail, but is actually one of the core ideas of the project. Pulling values directly from concrete representations allows you to always see what you’re doing—something that is lost as soon as you start hiding values behind abstract identifiers.
Dynamism and equality
As mentioned above, meta ink creates a dynamic relationship between the things it touches. Specifically, meta ink establishes an equality. All points connected by meta lines will have the same value, much in the way that all directly connected points in an electrical circuit have the same voltage. We can illustrate this with a basic example.
y) position can be changed freely, but their horizontal (x) positions are kept equal.
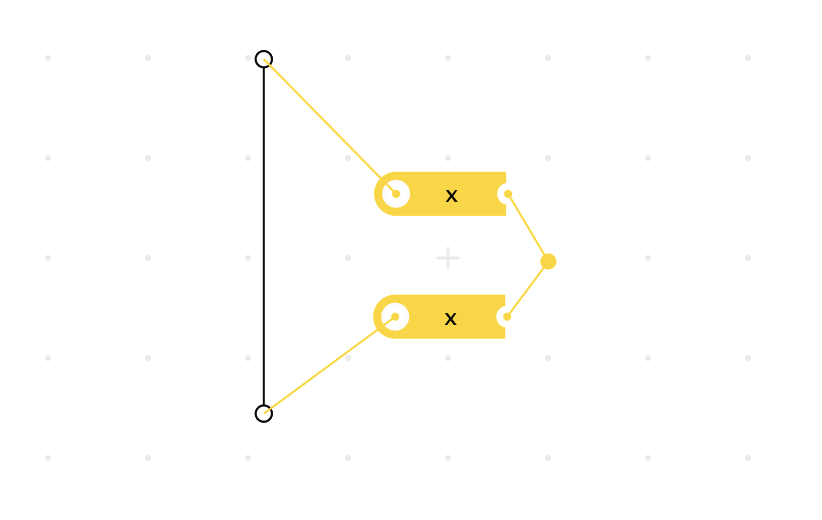
Here, the two property picker nodes select the x values of the two concrete points, and then the x values are made equal by the meta ink lines connected on the right.
You can build more complex relationships using additional meta nodes. For example, a concrete point can be animated by taking the sine of the current time.
Recall that we saw this same example earlier, only expressed a little differently. Here it is again, for stark contrast.
function update() {
  point1.x = Math.sin(Date.now());
  requestAnimationFrame(update);
}
update();
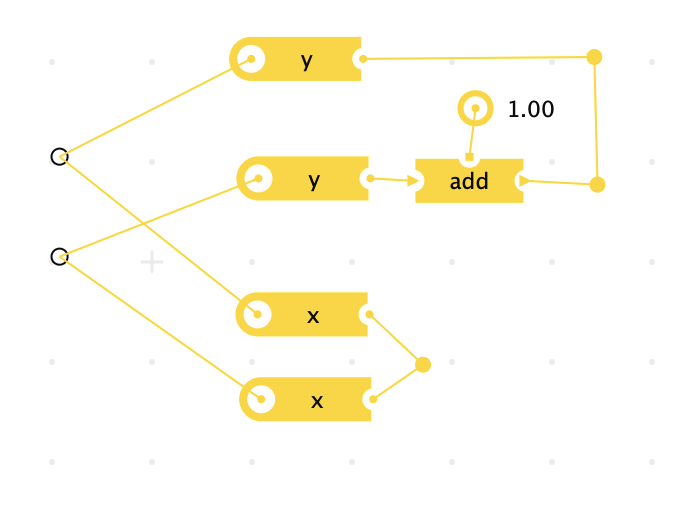
Meta nodes allow you to define relationships between concrete points. For example, the two concrete points below share an x position, and are kept one unit apart on the y-axis.
Reusable parts in the library
Recall that as we explore the basic concepts of Crosscut, we’re building toward the construction of a Varignon parallelogram.
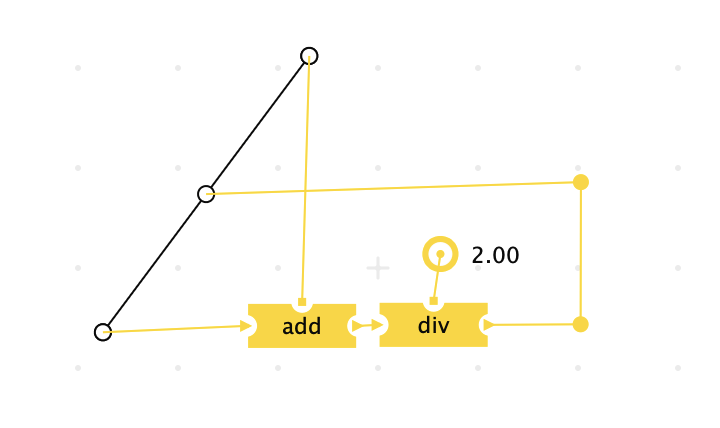
With what we’ve already seen, we can build a key piece of that geometric proof: a line with a midpoint.
We could rebuild this same construction three more times to get four separate lines with midpoints, but this is tedious. Instead, let’s do something very common when programming and turn it into a reusable component.
The status quo way to make this midpoint reusable would be to turn it into a function or a class, give it a name, expose some parameters, and call it by the name any time we want to use it. There are some issues with this. For one, we’re back to indirectly using named things rather than directly using tangible things. Second, when the function requires parameters, you have to to fill them in—and to fill them in, you have to know what kinds of values are meaningful. Types can be helpful here, but only to a point—you still need to know what the values mean to the function. All of this, again, forces you think more about the technicalities of the tool, instead of thinking with it.
Our approach is to flip this situation on its head. You don’t explicitly mark something as reusable—every drawing you create is a reusable part.
You can pinch to zoom-out from the drawing interface, which will take you to a library of parts. Here you’ll find all the parts you’ve created, plus all the parts and meta nodes that Crosscut includes by default, ready to be reused and remixed in the creation of new parts.
The library is a freeform canvas. You can place your parts wherever you like, grouping them together visually in whatever way makes the most sense to you.
There’s no button to create a new empty part. Instead, you create a new part by duplicating an existing one, and Crosscut includes a selection of helpful building-block parts to get you started. This duplicate-only approach encourages remixing and iterative making. This also makes it natural to create a “template” part for yourself with whichever things you use most frequently.
Encapsulation without lamination
You can take any existing part and drag it inside another to nest the first part inside the second.
When you nest one part inside another, its meta ink is hidden. Crosscut also draws a dashed yellow bounding box around the nested part to signify that it is, in fact, a part.
Here, we’ve nested the midpoint line from above inside an otherwise empty part.

You can still see and manipulate the concrete ink of the nested part. Meta ink still imbues the concrete ink with dynamic behavior, even though it is hidden. This places a particular emphasis on concrete ink as the material for representing the matter of your thoughts. Meta ink, and meta nodes in particular, are just for the low-level implementation of dynamic building blocks—an alternative to code that should fade away as you build up an elaborate model from simple parts.
Importantly, you can still snap concrete and meta ink to the concrete points of a nested part. The part may be nested, and its meta ink may be hidden, but it still exists in the same conceptual space as the things around it.
Most tools that offer some notion of nesting will wrap an impregnable boundary around the things being nested. We refer to this as lamination. It is a superfluous formalism that breaks the flow of thinking about the problem at hand.
Here’s an example from Max/MSP, a popular visual programming tool:
The blue rectangle is a bpatcher—a mechanism for embedding one Max/MSP patch into another. You can still see the nodes inside, but you can’t connect wires to them or move them around.
We designed Crosscut so that it can have encapsulation without lamination. Nested parts give you encapsulation—they allow you to create an easily reusable piece of concrete ink with its own internal behavior. The visual elements in Crosscut have important semantic qualities, and encapsulation doesn’t diminish that.
We are now ready to build the quadrilateral proof in an ergonomic manner—by dropping in four midpoint parts, snapping them together, and drawing concrete lines between adjacent midpoints.
We’ve now shown how Crosscut can be used to turn a handful of graphic primitives into reusable building blocks, and how to combine those into a richly interactive model. This kind of composition is common when programming with static text, but Crosscut lets you do it while working with live, tangible things.
Next, we’ll look at how the things you draw in Crosscut can be imbued with more dynamic behavior.
Sharing values with ports
There are often situations where you want to share meta ink values between a nested part and its containing part. While you can connect meta ink to a nested concrete point from both inside and outside the nested part, using concrete ink as an interface for sharing values doesn’t make much sense. We need some other way to connect the meta nodes inside a nested part to the meta nodes outside it.
For this, we introduced port meta nodes. A port is like the inverse of a property picker. Instead of selecting a single property (like x or y) from a more complex element, they let you create a new property that can later be selected.
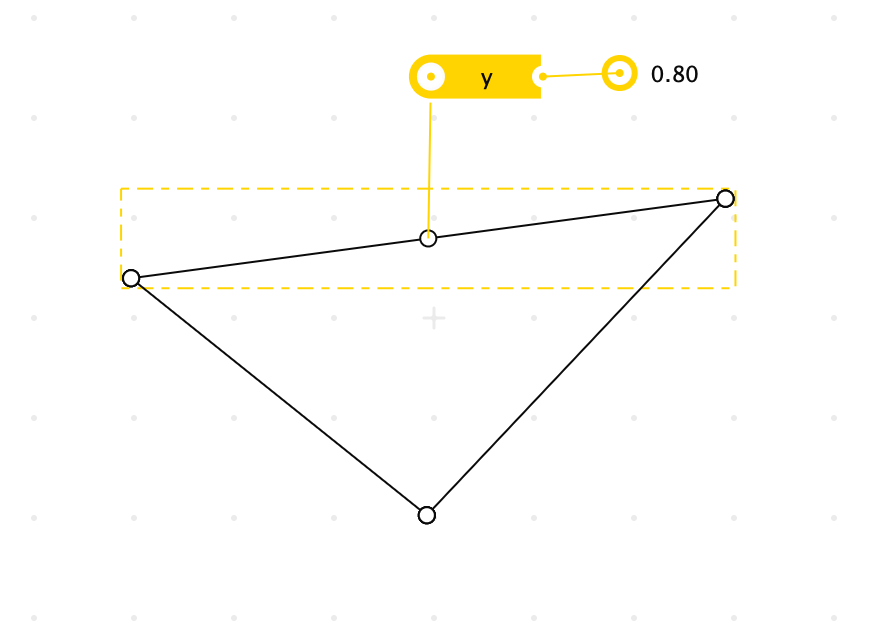
Consider a more general version of the midpoint line from above, where now the middle point can be shifted between the two endpoints.
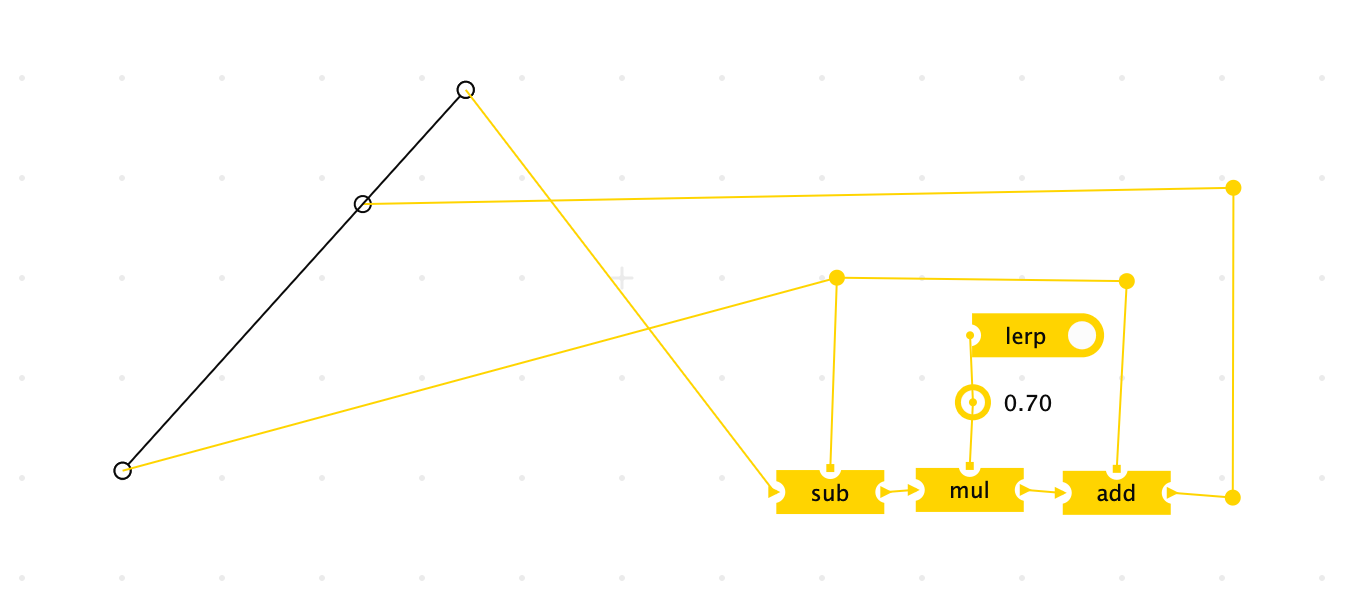
In the example above, the node labelled lerp is a port. The port has no value by default, so it’s connected to a value node set to 0.7 for the sake of our example.
Recall that a nested part is given a dashed yellow bounding box. You can snap meta ink to this box. If you connect a property picker to the bounding box of a part, any ports inside that part can now be selected.
In this example, we’ve nested the part from the example above, and are animating the lerp property from outside.
As you’ve probably noticed, this approach runs counter to our goals. It introduces naming, which we sought to avoid. Worse, it’s a move away from tangible representations, in two ways. First, these port names aren’t visible from the outside of a nested part until you connect a property picker. Second, this approach connects visible meta nodes outside a nested part to invisible meta nodes inside it, so you can’t see the whole system at once. All of these issues could be addressed or avoided entirely by enriching the GUI.
Repetition with repeat and spread
Repeating things with controlled variation is one of the fundamental powers of the computer. The status quo here is some form of for i in … loop, where you have to not only understand and map the abstract symbols within the loop body to their imagined result, but you also have to imagine how varying i will change the result.
With Crosscut we explored ways to make repetitions more tangible, without the need to simulate them in our heads to understand what’s going on. We offer two takes on this, albeit both with some issues.
The first is repeat. This meta node allows you to clone a part any number of times. On its own it would be pretty much useless, as it would spawn the same part over and over in the same place. To modify each clone distinctly, they are each given a numerical index value by the repeat node. Inside the part, the index can be accessed using a port, and the part can then manipulate itself so that its concrete elements change as the index changes.
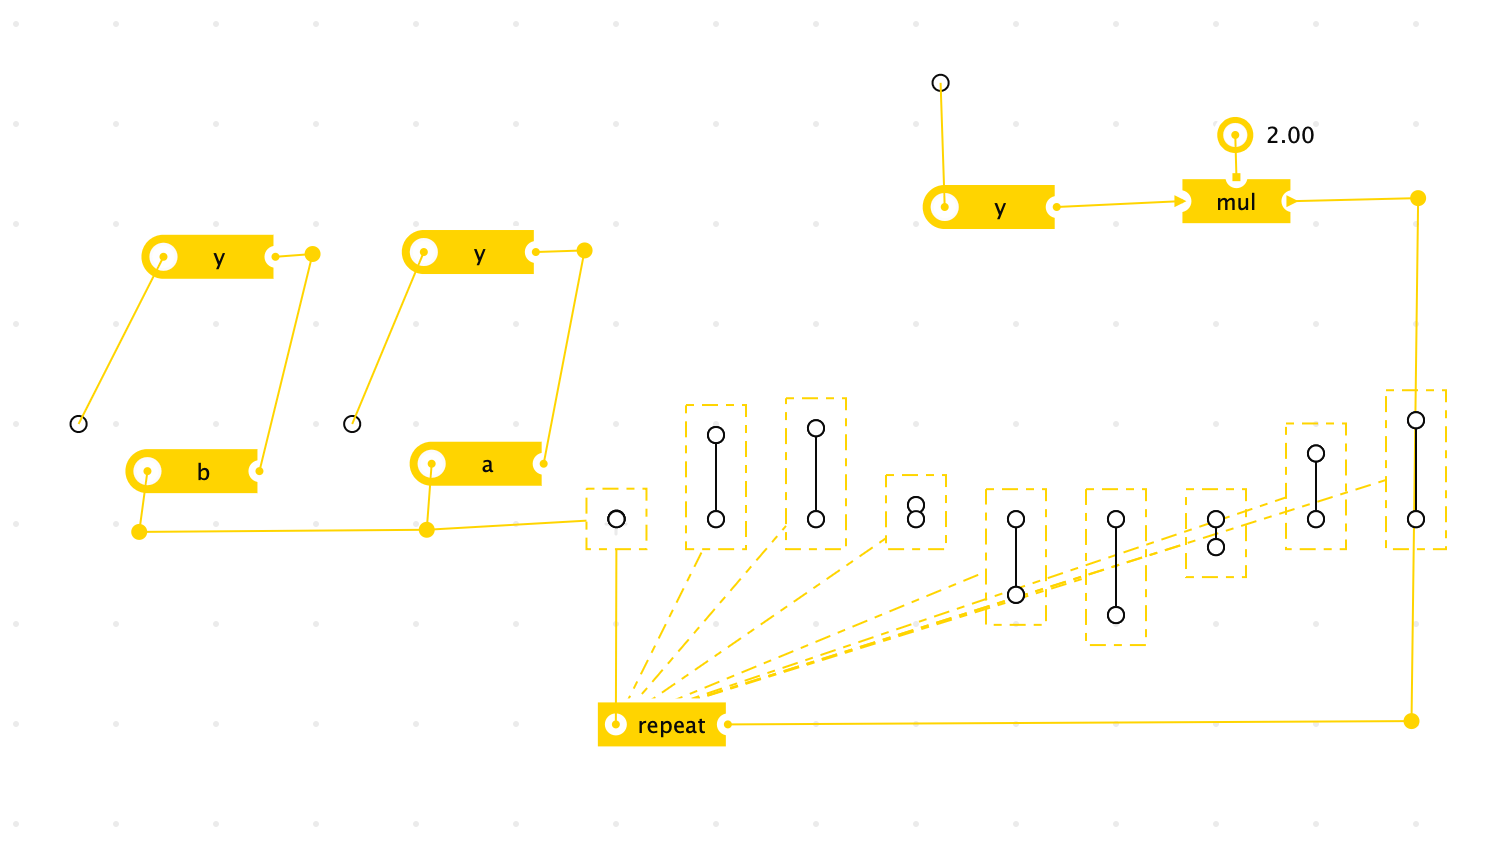
That’s a complicated description, so let’s walk through an example. Below, there is a nested part of a line with a height property. We’ve set up some meta nodes that will give this line a height based on the sin of the x position of one of its concrete points. The example above also includes props named a, b, and index. In a moment, we’ll use these to manipulate this example from outside. For now they have no effect, and the math nodes to which they’re connected will just use sensible defaults.
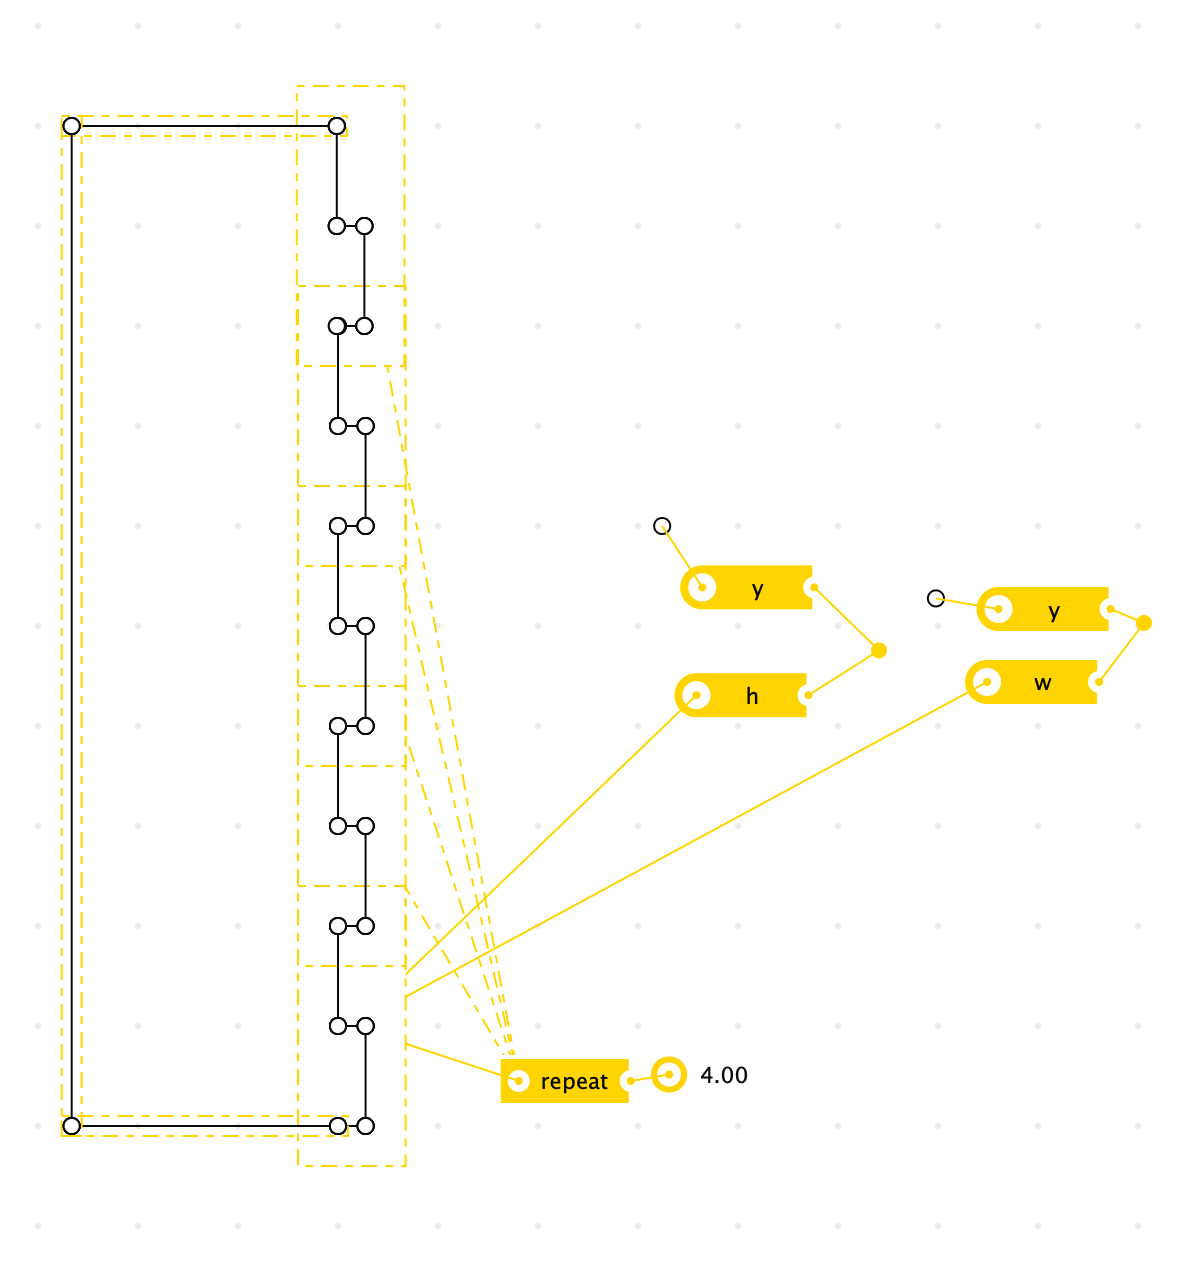
To better see the sine wave formed by this part, we nest it inside another part, and connect it to the repeat node. We then connect the repeat node to a numeric value, specifying the number of clones to create.
This example includes three ad hoc sliders—concrete points connected to y property pickers that you can drag up and down to manipulate numeric values.
a, b, and repeat parameters. (Note that the repeat slider resets the position of the other sliders—this is a bug, which we discuss near the end of the essay.)
In our experience, this approach using repeat and index feels too much like conventional programming. You have to first build the part that will be repeated—imagining how changing index will impact it—and then use it in some other part to see the result. This is the sort of playing computer in your head we are trying to avoid.
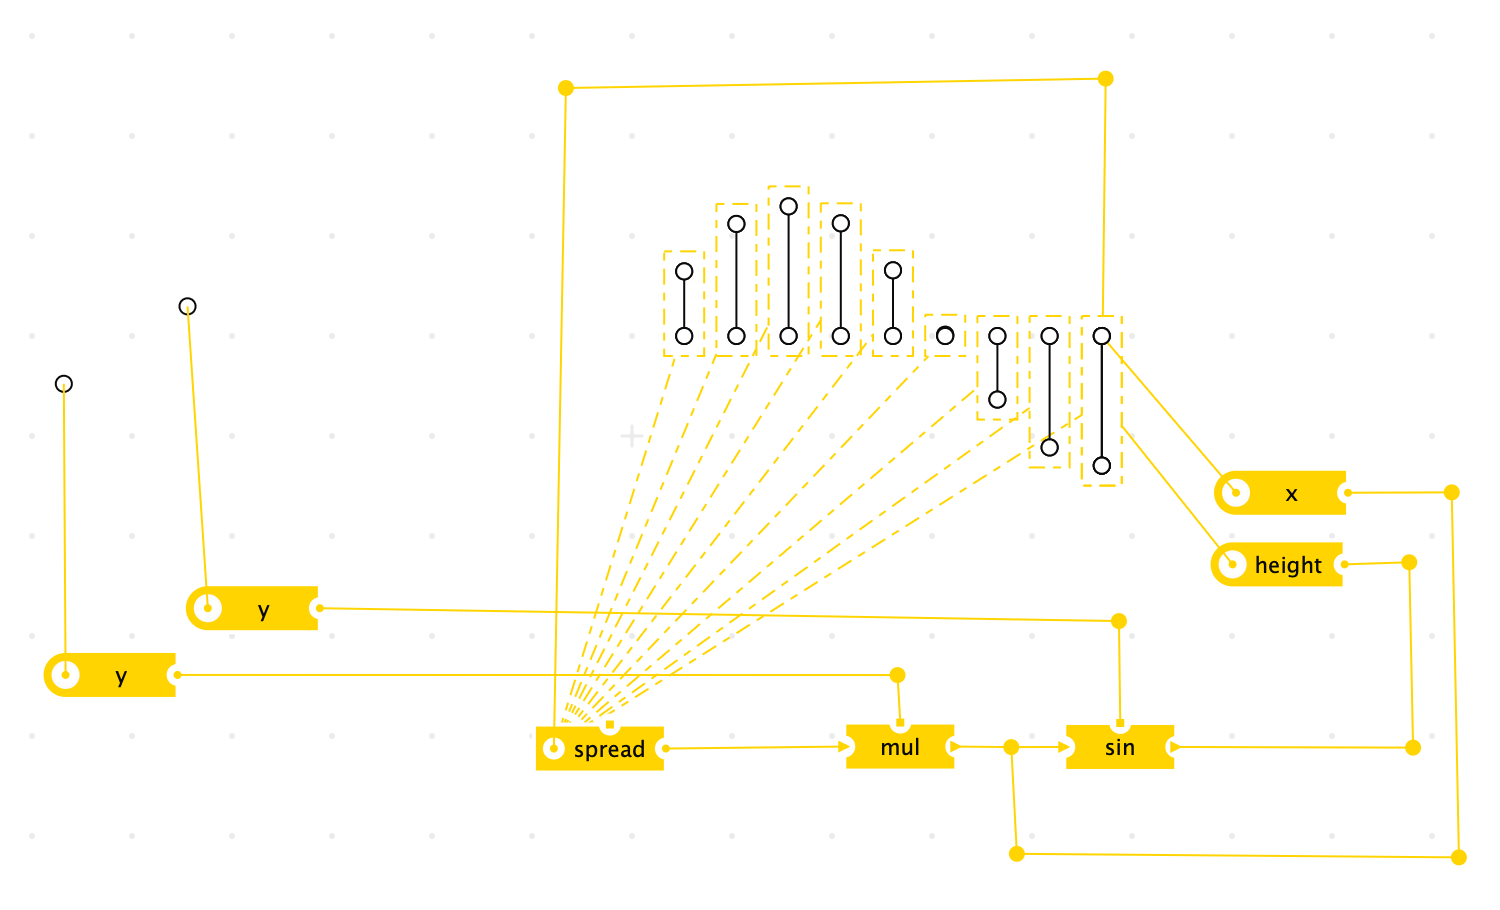
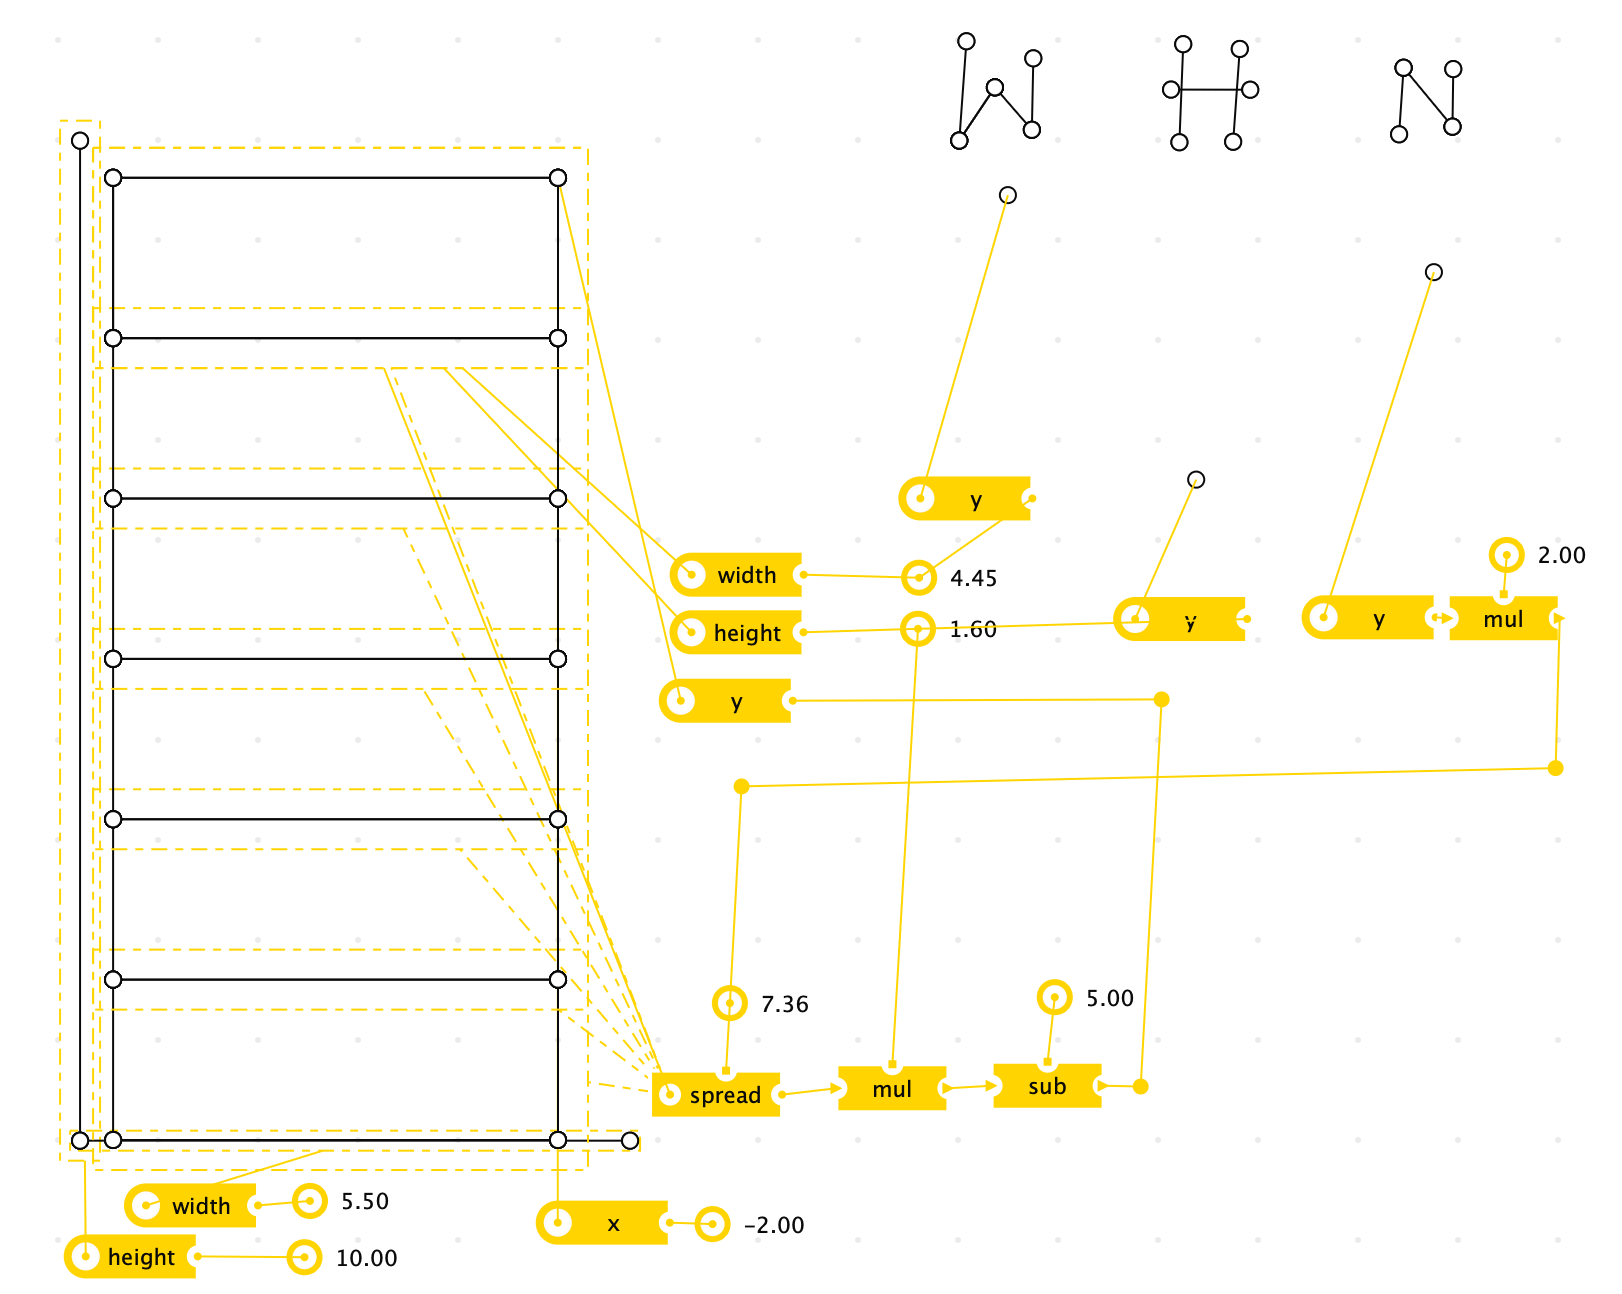
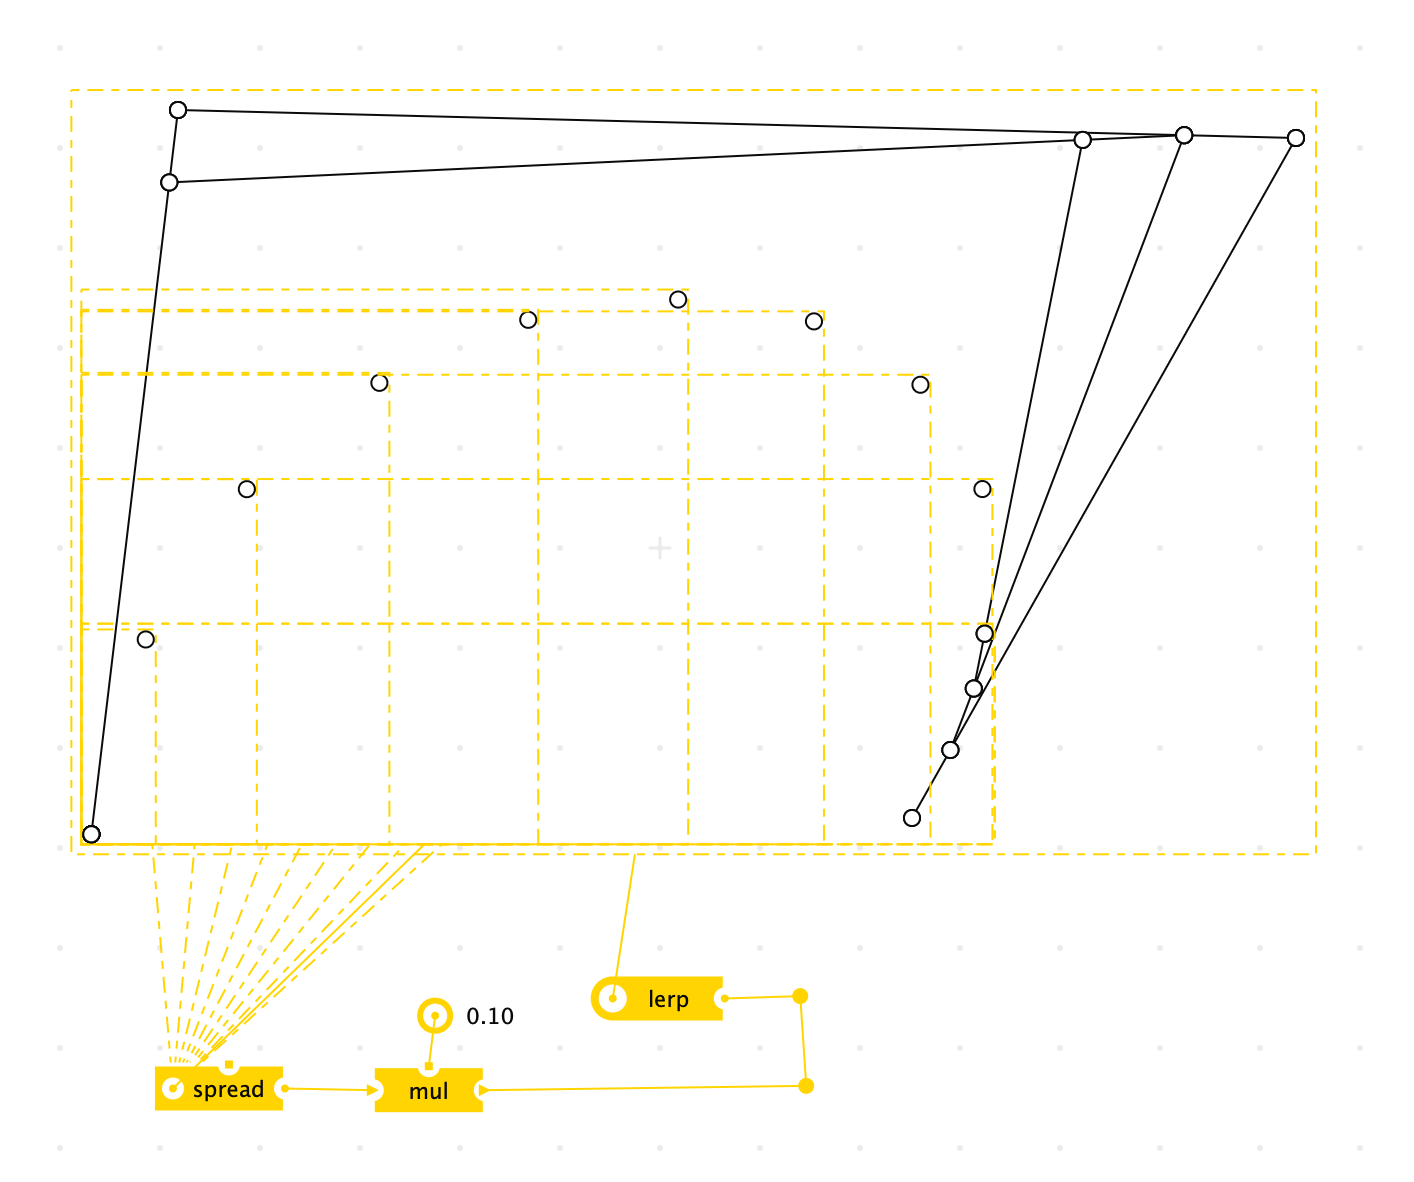
To improve on this, we made a second attempt at repetition with a spread meta node. With the spread node, you connect one end to the part to be cloned, and the other end to the calculations that will change with each clone. With the original repeat node, the logic that created variation with each clone lived inside the nested part, in a separate context from the logic that created the repetitions. With the spread node, the varying logic lives right in the same space as the logic creating the repetitions.
In the below example, we use the same line with a height prop that we started with for the repeat node example above. We also use the same sine wave logic, but this time these nodes are connected directly to the spread node.
mul and sin nodes.
Repetition is a great enabler of dynamism. Sadly, neither approach we took was a resounding success within our prototype. The repeat node is disembodied and decontextualized. The spread node composes poorly, and performs spooky action at a distance by manipulating nested parts in a way where the exact nature of the manipulation is unclear. Finding richer mechanisms for repetition will be an important direction for future work.
Spatial queries
Both repeat and spread, in abstract sense, are a way to turn meta ink values into concrete ink representations. Spatial queries are the inverse: a way to turn concrete ink into meta ink values.
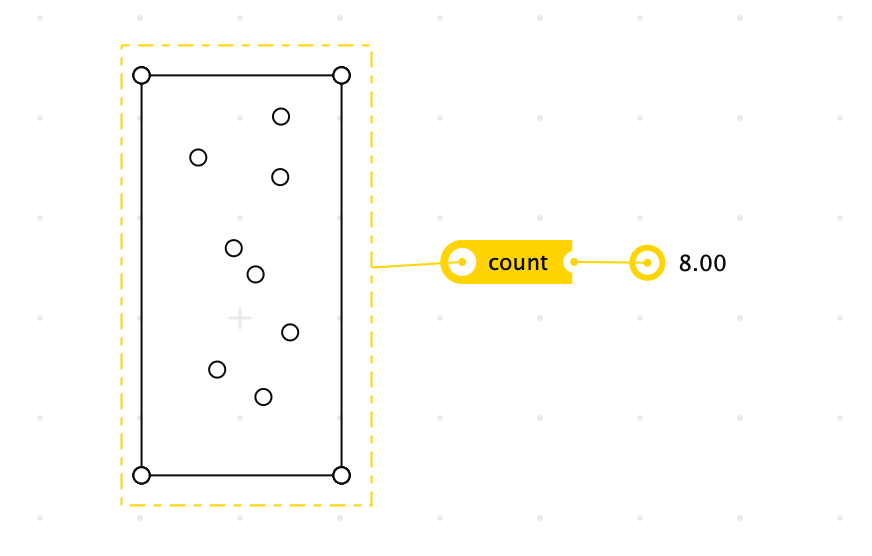
Every nested part in Crosscut is automatically given a special count property, which you can access by connecting a property picker to the dashed yellow bounding box. If the part includes any concrete lines that happen to form a polygon, the count property will equal the number of concrete points that are enclosed within this polygon.
count updates.
The spatial queries as they exist in Crosscut right now are very limited. They only count concrete points, and only within a specified space. But, they compose nicely with the rest of the system. You can dynamically move concrete points in and out of the polygon, or move the points forming the polygon, or the part that contains it. Everything remains alive.
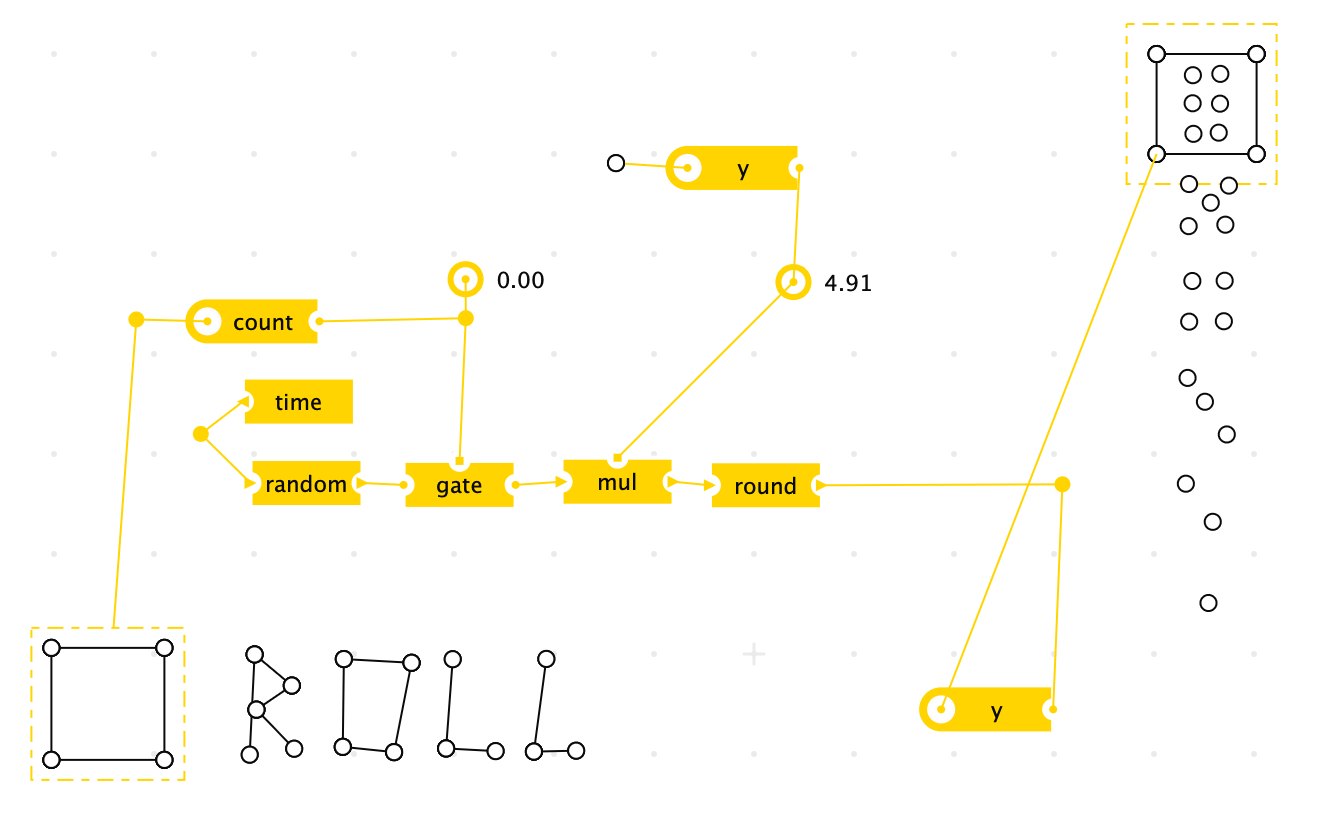
Consider this playful example of a simple step sequencer, with a sliding playhead that counts concrete points on the bottom left, banging a “drum” on the right.
Notice that the playhead is just the line with a variable midpoint position that we saw earlier, connected to the line with a height property, connected to a square made out of two height lines and two similar width lines. By building up from simple parts we can quickly create rich, dynamic models. Notice too how little meta ink we had to add to turn these component parts into a step sequencer. This recombination of concrete parts is how Crosscut best enables you to focus on your thoughts, not on the workings of the computer.
Findings and open questions
Building with parts
We wanted working in Crosscut to not feel like programming. Building models by reusing and remixing existing parts is where we came closest to achieving that feeling. Typically, you only need a small amount of additional ink to make two parts work together—a few concrete lines to complete the drawing, some meta ink to unify behaviors, that’s all it takes. Ideally, we would want to snap together most parts without the need for any additional meta ink, but this is something that still needs to be explored.
The breadth of constructs you can build with just a few simple primitives is surprisingly wide. While implementing Crosscut, we continually tested it by building an ever-expanding variety of little models, tools, and toys. We built Bézier curves and wild geometric forms, time-based devices such as clocks and sequencers, a dice roller, a simple electrical diagram, a temperature converter, snappable logic gates, curve plotters, and more. See the appendix for demos of some of our constructions.
The program is the drawing
Crosscut is one of the few programming systems that puts live-running code and tangible data (the concrete ink you use to make a model) together in the same space. What’s more, Crosscut allows you to work with both of them using the same metaphors and direct-manipulation tools.
This is in contrast to the traditional separation between the code and the running program. There are several prominent tools that have attempted to reduce this separation.
There’s never any uncertainty about where dynamic behavior comes from. If you see a yellow line touching something, that thing will be manipulated dynamically, and you can follow the yellow line to see exactly what drives the dynamism. In principle, a screenshot gives you enough information to recreate an entire system and its exact state—the program is the drawing.
Drawing lines to concrete representations as a way of pointing to things has much smaller cognitive overhead than having to pick a name for each thing you’d like to refer to. What’s more, it feels fun to work in this way. Snapping is a very immediate and playful primitive, and allows you to construct both “data” and “code” in this environment using very familiar primitives.
No syntax or runtime errors
Crosscut is both the programming environment and an execution environment. There’s no code-compile-run loop. Everything you make is always there, alive and ready to respond. A valuable consequence of this design is that there are no syntax or runtime errors.
const point1 = Point(1, 2);
point2.x = 10;
Consider the above code. We create a variable named point1, and then try to manipulate a variable named point2, which doesn’t exist. It’s not possible to make this mistake in Crosscut. Since you always have to wire directly to an existing embodied representation, you can’t request something that doesn’t exist.
In Crosscut, every value that flows through meta ink is either a concrete point or a number. Every meta node can work with both types of values. This means it’s impossible to get type errors when constructing graphs. Additionally, all meta nodes have default values for each input/output snap point. These two features keep your construction live and responsive even while it’s only partially implemented. We believe that through careful design it’d be possible to maintain this property while supporting additional data types.
You can still easily get an unexpected result, but you’ll always get some result. In our experience, this approach promotes tinkering and feels much closer to sketching than to programming.
It’s worth noting that runtime errors can be avoided with systems like a static type checker, pushing the problem into compile time. The result is that your program is often in an in-between state where it won’t even start until all errors have been resolved. This “if it compiles, it works” approach is the opposite of what we were trying to achieve with Crosscut.
Bidirectional evaluation
It feels delightful to wire a relation between two objects and have the relation work exactly as you expect. You can experience the relationship between parts very immediately by wiggling any of the points. This causes the other interconnected points to wiggle in concert. This works even with complex relations between them, allowing you to get an intuitive feel for the systems behavior
This is achieved using a technique called bidirectional evaluation. When something concrete changes, that change is propagated through the network meta ink and meta nodes, updating everything connected to the source of the change. When a change flowing through a meta node enters from the left or top snap point, a forward implementation of the meta node’s functionality is used. When a change flows in from the right snap point of a meta node, a separate backward implementation is used.
Implementing bidirectional evaluation isn’t as straightforward as it may seem. In part this is an inherent consequence of the unidirectionality of many math functions. In part this is due to our primary focus being on the features of Crosscut that allow composition via parts, with the exhaustive particulars of meta ink being a less relevant thing to focus on. Our implementation was good enough to validate our use case and satisfy our goals, but had some frustrating shortcomings, which we’ll outline here.
Firstly, a limitation inherent to math: not all meta nodes have a meaningful backwards interpretation. For example, the range of sin is only defined for values [-1, 1]. If you connect a concrete point to the right snap point of a sin meta node, and drag this point outside the range, there are a number of different things that could happen. In our prototype, when backward evaluation would have an unclear meaning, the meta node will simply stop the flow of change through it in that direction. A more thought-out approach would be preferred here.
Secondly, a limitation we could have solved with design: even though meta nodes work forwards and backwards, there’s a preferred directionality to them—input on the left, output on the right, constant on the top. It can be very hard to interpret the directionality of a constructed graph. What does it mean for the computation to go one way or the other? This is something that can be learned by experience, but it’s not well communicated by the system. In our prototype, any meta node that has a different effect depending on the direction of flow, no matter how subtle, has snap points that are drawn as little triangles pointing in the forward direction. A richer implementation might use a stronger visual cue, like animations that show the occurrence and direction of data flow.
Thirdly, a limitation we could have mitigated with engineering. It’s possible to construct graphs that are perfectly valid but evaluate incorrectly. For example, cyclical graphs are especially likely to produce wrong or counterintuitive results.
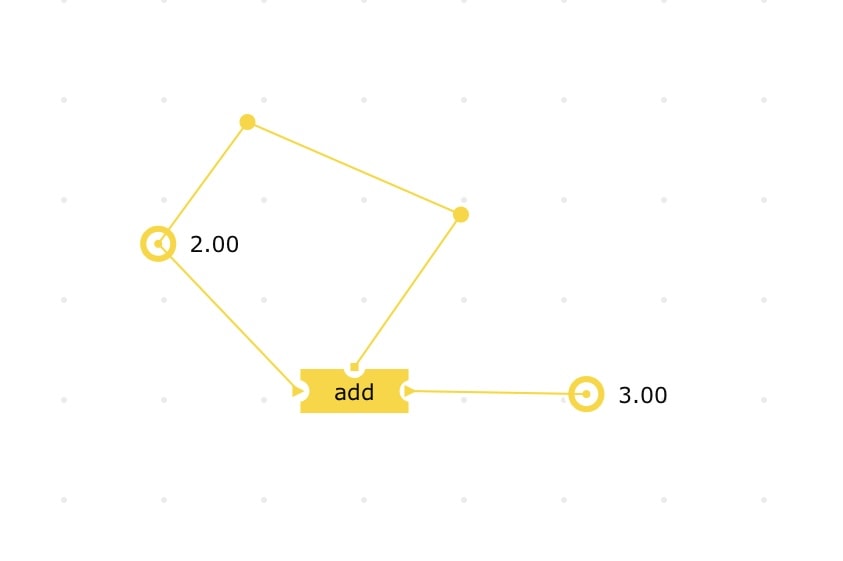
Updating the value on the right will cause the add operation to run backwards. This will in turn trigger the add operation to run forwards again, causing a loop. The result is unexpected and mathematically incorrect.
Simple spatial queries
In our
There were a few ideas that we considered but didn’t have time to explore:
- A way for meta ink to work with collections of objects, which would allow us to work with more than just a count.
- Queries for geometric properties like distances, angles, intersections, etc.
- Queries that work in reverse, so that concrete objects that satisfy a query are manipulable through meta ink.
- Visual feedback when an object satisfies a query.
Repetition of things in space
Repetition is one of the most significant capabilities that computers can offer us. Finding a way to do repetition within Crosscut was an important goal. The repeat and spread meta nodes are two attempts at repetition of things in space, but both leave a lot to be desired.
The repeat node feels very much like programming—exposing the index property inside a part is obviously bad. It usually means that every time you want to do some repeating, you need to design a bespoke part to be repeated. It doesn’t encourage reuse of existing parts in a generic, ad hoc way.
The spread node feels like a step in the right direction, by flowing repeated logic through meta ink on the same level as the rest of the construction. But this can still be confusing to work with, and doesn’t provide enough visual feedback.
With both repeat and spread, we felt the need to show a connection between the node and the repeated parts. We used a dashed yellow line, but this wasn’t something we spent any time designing. Even with this dashed line, there is still a sense of spooky action at a distance, something we wanted to avoid in the project.
Future research should look for more ways to do repetition—both repetition of things in space, and other kinds of repetition too—while adhering to the design principles of Crosscut.
Conclusion
One of our earliest goals for the Crosscut project, before we even arrived at the idea that it should be a tool for drawing dynamic models, was to look for potential key ingredients that ought to exist in a tool that allowed programming through drawing. We expected that spatial queries and repetition would be such ingredients, and they probably are, though we weren’t able to explore them as much as we’d hoped. What we did find, through building the prototype, letting various people experiment with it, and reflecting on it in this essay, is that building models by combining simple, programmable parts feels wonderful.
The combination of meta ink directly connecting to concrete ink with encapsulation without lamination and everything is a part really sings. It shouldn’t come as a surprise—composition of simple parts is a major theme of conventional programming and countless other creative practices. But what excites us here is how this composition was achieved while adhering to our specific design principles, despite the fact that the principles push against common programming practice. In Crosscut, you are always in touch with your concrete things while dynamically combining them. The computer’s processing helps you with the calculations it’s good at, while the touch and stylus interface gives you a sense of immediacy that we’d never really felt in a programming tool before.
We will continue exploring these ideas, and we encourage you to explore them too. If you find things that feel like key ingredients, please share them with us. There seems to be a lot of enthusiasm for reimagining programmable tools with an emphasis on concrete representations, and a newfound energy in the pursuit of tools for thought. We’re excited to see what comes next.
We welcome your feedback:
Thank you to everyone who offered feedback and guidance throughout the project: Blaine Cook, Peter van Hardenberg, Josh Horowitz, Scott Jenson, Martin Kleppmann, James Lindenbaum, Geoffrey Litt, Kevin Lynagh, Rae McKelvey, Omar Rizwan, Chris Sun (daiyi), Eileen Wagner, Adam Wiggins
Appendix: Examples
Designing a bookshelf
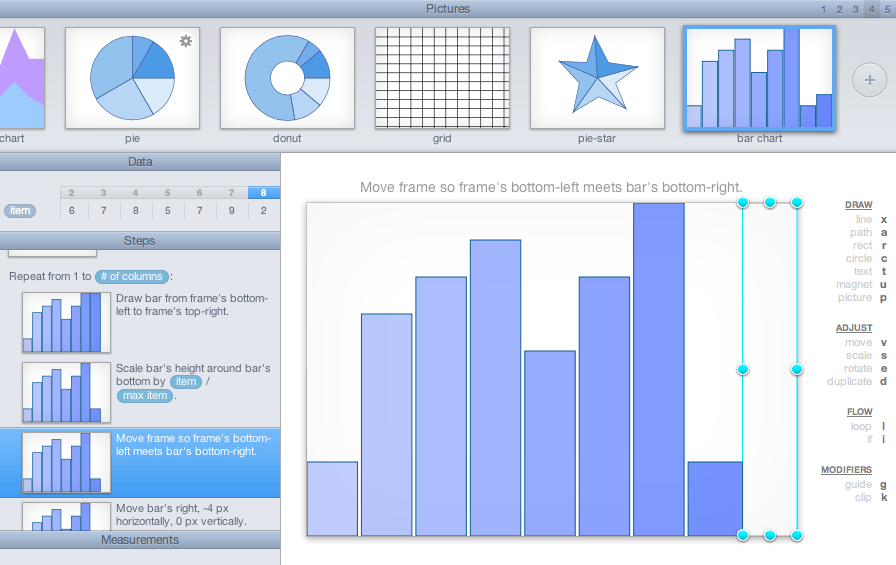
I moved apartments, and now I have this 5.5' by 10' wall for which I’d love a custom bookshelf. I’ll use Crosscut to quickly sketch the wall dimensions using width and height lines, and then drop in a rectangle and a spread to see which configuration I like the most.
W (width), H (height) and N (number of shelves) to change the properties of the bookshelf design.
Crosscut was a tightly-focused research prototype, but it’s easy to imagine ways it could be broadened and enriched. For example, you could drop a photo of your wall next to this construction, and then play with parameters in a more grounded context. This shows how Crosscut could grow into a powerful thing to think through: import some reference materials, roughly sketch new ideas, drop in ready-made parts to make the sketches dynamic, and then explore possibilities.
Joinery for laser cutting
I’m working on a custom box design to be made out of multiple plexiglass parts I have left over in my workshop. I’m trying to figure out good proportions for the joinery teeth, so I make myself a little playground to explore what “looks” good. My approach was always more art than science anyway…
In addition to importing existing media, another easily imagined improvement to Crosscut would be support for exporting your work, for instance as an SVG. That would allow Crosscut to be used as a tool for building visual prototypes that could be shared with other people or other tools. It’s important to remember that we want to push back against tools for thought being too production-oriented, so any export feature would need to be designed with care to maintain the essential sketchy feel of Crosscut.
Rolling dice
I want to play a board game with my friends, which requires d4, d5, and d6 dice. But we can’t find them anywhere! Not a problem—I can quickly construct my own configurable dice roller with a couple of parts and some ingenuity.
y ad hoc slider at the top to adjust the range of the rolled values, which represents the number of faces on the die.
Crosscut’s approach to immediacy and concrete representations feels like a natural fit for situated software. If you want to write some software to solve a simple problem for a few friends in the room with you, you shouldn’t have to go down to the basement computer, create a repo, write a program, compile it, debug it, deploy it, then come back upstairs to find everyone has gone home. You should be able to plunk an iPad down in the middle of the table, collaboratively sketch out what you want, add a tiny bit of dynamic behavior, and within a minute or two get back to board game night. This scenario—sitting around a table, playfully collaborating on a dynamic sketch with friends or family—feels profound to us, and is not addressed by any currently popular approach to programming software.
Understanding the Bézier curve
I’m teaching an introductory course to computer graphics, and we’re currently studying the Bézier curve. I find that it helps the students gain an understanding of the material by modeling it together as a group. We start by building an innocuous construction from a bunch of lerp lines.
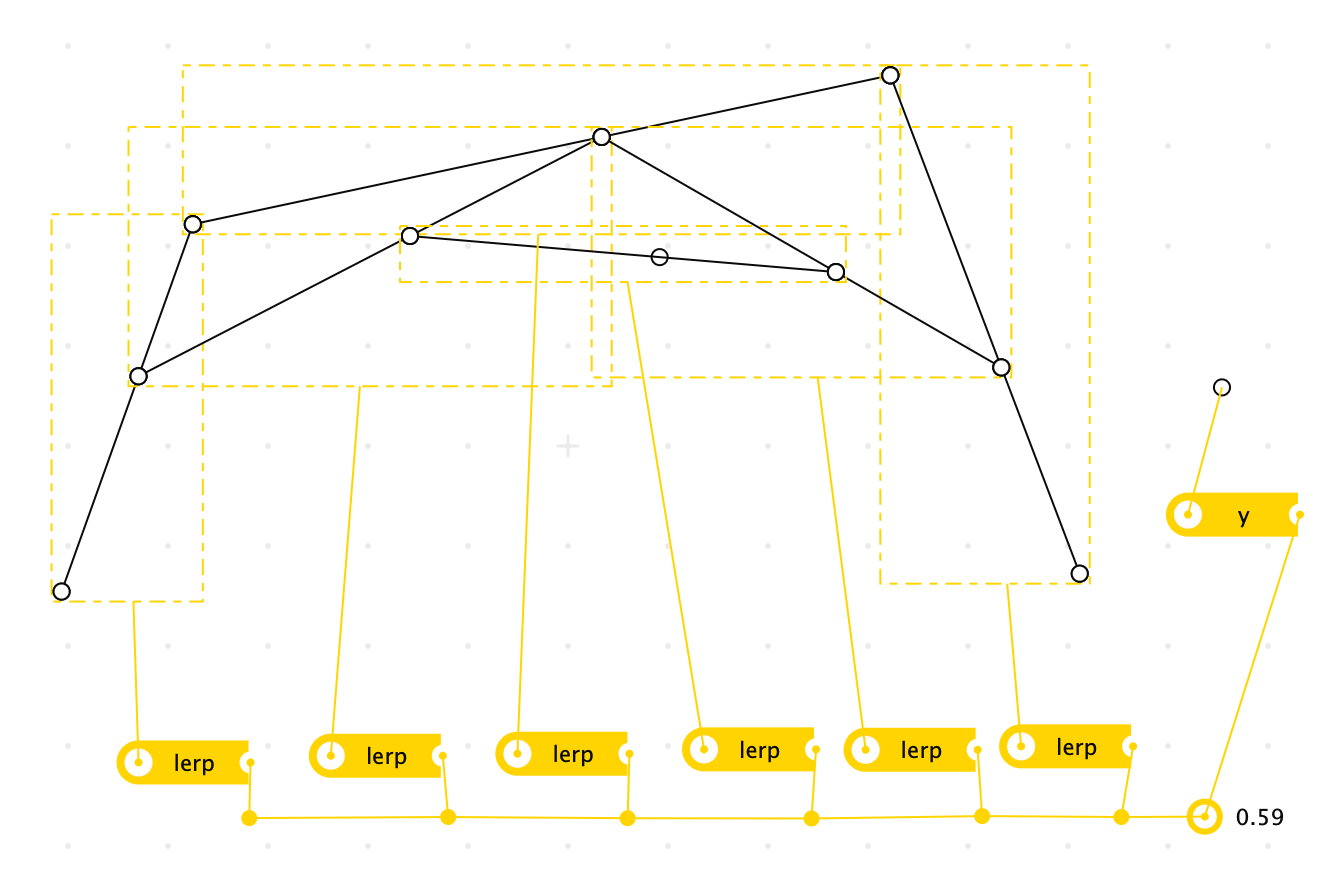
Then, we spread over them using the middle point of the highest-order (innermost) lerp, which leads to an “aha!” moment for the students.
lerp-line points to change the dotted path traced by the inner spread points.
Crosscut was inspired by understanding through building, a process of gaining an intimate feeling for an idea by building examples and objects to think & play with. It’s only natural that Crosscut works well for building examples from graphics and geometry, so they make for easy demos. But we also want to be able to build other things, too. One major omission from our prototype which, again, it would be easy to imagine adding is text. Crosscut’s directness and dynamism would be lovely for working with poetry, interactive fiction, semantic mapping, and all sorts of other explorations in the space of language. We considered multiple approaches to text, including building a system of lettering and recognition on top of our vectors and queries, but didn’t have the opportunity to test these ideas with a proper design and implementation effort.
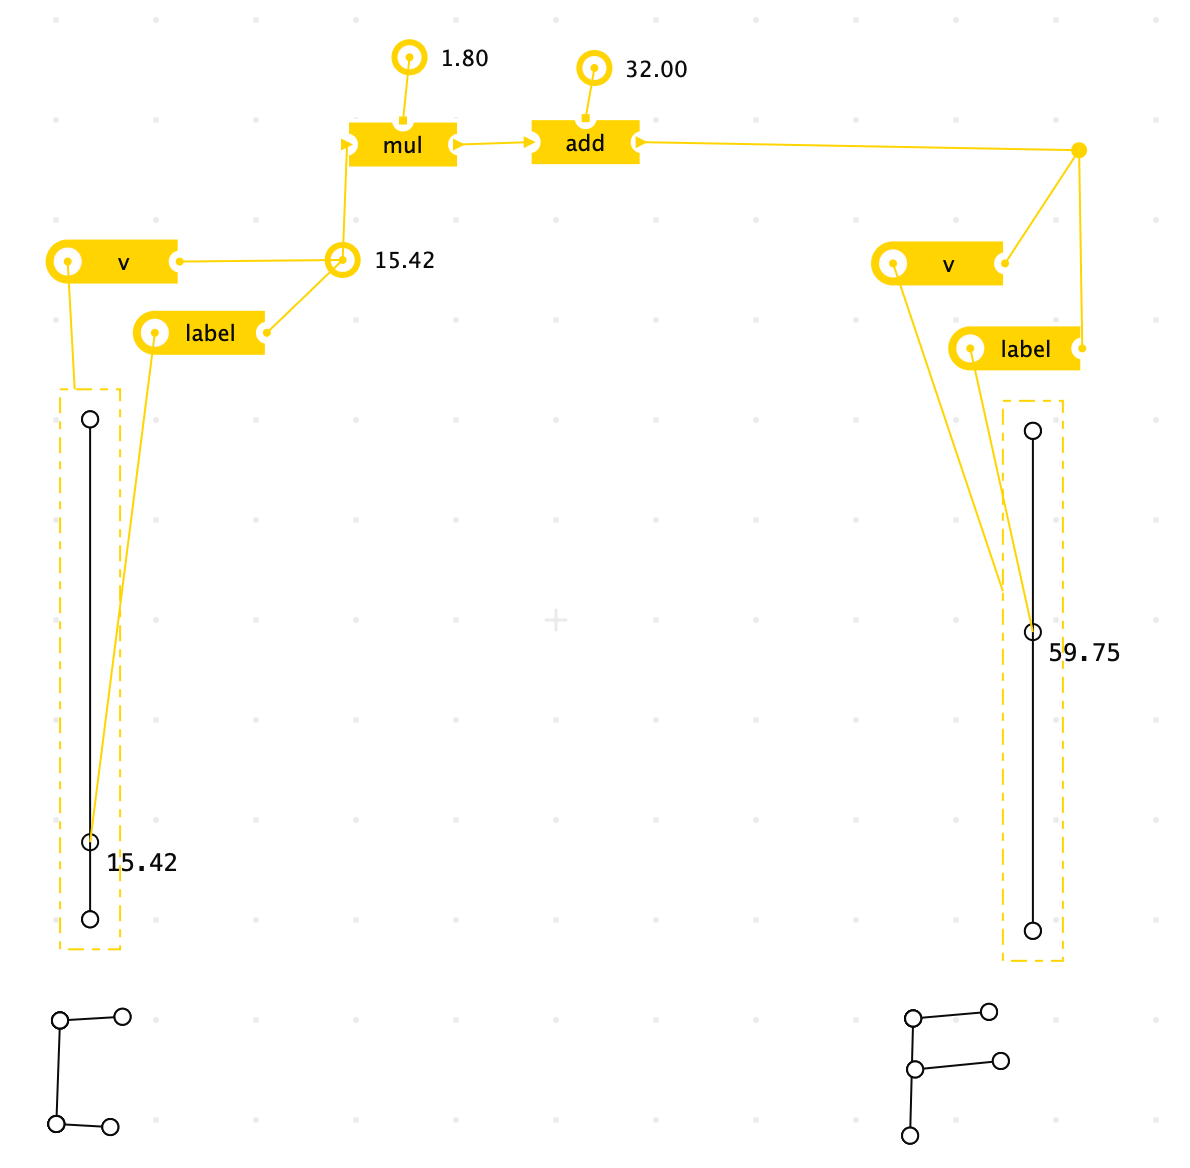
Converting temperatures
I wanted to understand how temperatures in Celsius and Fahrenheit relate, so I made a bidirectional temperature converter. Crosscut is inherently bidirectional, so I only needed to throw together two sliders with a mul and an add meta node. By sliding the numbers up and down on either side I can see what the temperature is in the other unit.
This example is an interesting one to end on. It’s similar to the die roller, but different from all the other examples, in that it’s less like an externalized thought—some idea you have that you want to reflect on—and more like a tool that enables you to do something else. Sure, the act of building a temperature convertor allows you to gain an intuition for how the two scales relate. But after that learning through building is done, you’re left with an artifact that can serve a useful function. When we started working on Crosscut, we weren’t sure if it should be focused on tool-building or model-building. As the project progressed, we gravitated toward the latter. This means you can imagine something like Crosscut, some stylus & tablet tool for drawing dynamic things, but designed with an emphasis on building tools that enable you to do something else rather than models that are a thing to think through. The difference is subtle, but it is its own path that leads to a separate set of discoveries just waiting to be made.